Tuesday, 17 August 2021

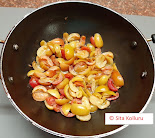
Methi corn tomato subzi

Fresh corn is available in market now. When fresh, the corn is very tender and sweet to taste. Due to the COVID situation, there is a lot of awareness about eating the right kind of food! Fresh green vegetables supply a lot of fibre and other nutrients. 

To the methi and corn, add some diced tomatoes and you get a very attractive subzi with the Tricolour of our Indian Flag! 

This time my recipe is with tomato, corn and methi leaves! Celebrating Indian Independence Day!!

If methi leaves are not available, you may use any other green leafy vegetable like palak. 


 Ingredients:
  • 1 bunch fresh or frozen methi leaves ( Fenugreek)
  • 1 cup fresh sweet corn
  • 2 medium tomatoes, diced
  • 1 large onion
  • 3 Teaspoons oil
  • 1 Teaspoon red chili powder
  • 1 Teaspoon garam masala
  • 1/2 Teaspoon jeera powder
  • 1 Teaspoon jeera seeds
  • Salt to taste
Directions:

  1. Wash and clean methi leaves.
  2. Discard the hard stems.
  3. Chop the leaves coarsely. (About one to two cups)
  4. Shred the corn ( About a cup)
  5. Clean and dice the onion.
  6. Dice the tomatoes.
  7. Heat oil in a thick pan.
  8. Add jeera seeds.
  9. Add onion and stir well.
  10. When onion pieces turn translucent, add shredded corn.
  11. Stir well.
  12. Cook for 2 or 3 minutes.
  13. Add half cup water.
  14. Add methi leaves. Keep stirring.
  15. Add masala ingredients.
  16. Add more water according to taste.
  17. Cook for 4 to 5 minutes.
  18. When the corn is soft to touch, remove from heat.

Note: 

If methi (fenugreek) leaves are not available, the same recipe can be made using any green leafy vegetable like Palak or spinach etc. Before removing from heat, a spoon of Kasuri methi (dried methi leaves) can be added. Rub the kasuri methi in your palm and add the powder to the subzi. Cook for a minute.




Friday, 13 August 2021

Vakkaya North Indian style pickle ( Karuvanda North Indian style pickle)


Vakkaya is well known as Karuanda in Hindi and also Bengal Currant. It is also known as pickle berry! The fruit is quite tangy. Variety of chutneys and pickles are made using these fruits. Vakkaya contains pectin and accordingly is a useful ingredient in making jelly, jam and chutneys.

Vakkaya is a rich source of iron, so sometimes it is used in treatment of anaemia. It contains a fair amount of Vitamin C. The fruits are available during monsoon season. Ripe fruits exude a white latex when severed from branch.

Vakkaya is very similar to cranberries, available in USA at Thanksgiving time. Many Indians who reside in USA, use cranberry as an equivalent in many vakkaya recipes.

In this recipe, I made a pickle with ingredients like saunf, dhania, kalonji etc. which are used in North Indian pickle making.


   Ingredients:


  • 1 Cup vakkaya cut into pieces and deseeded
  • 3 Tablespoons saunf (fennel seeds)
  • 2 Tablespoons dhania (coriander seeds
  • 1 Teaspoon methi seeds (frnugreek)
  • 1 Teaspoon mustard seeds
  • 1 Teaspoon kalonji
  • 1 Teaspoon turmeric powder
  • 2 Teaspoons chili powder
  • Salt to taste
  • A pinch of hing (asafetida)
  • About a cup oil


Directions:


  1.      Wash and clean the vakkaya.
  2.      Cut the vakkaya into 4 pieces (lengthwise).
  3.      Deseed the pieces.
  4.      Set aside.
  5.      Heat a thick pan and add saunf seeds. 
  6.      Roast all the seeds separately and leave them to cool.
  7.      Heat 4 to 5 Tablespoons of oil in the pan.
  8.      Add the vakkaya pieces and cook them for 3 to 4 minutes.
  9.      Keep stirring.
  10.      When the pieces are slightly soft, turn the heat off.
  11.      Grind all the roasted seeds in a grinder.
  12.      Coarseness of the powder can be according to your taste.
  13.      Add turmeric powder, chili powder and salt to the ground mixture.
  14.     Mix well.
  15.     When the pieces are cool, add the powdered mixture and stir well.
  16.     Set aside for a few hours,
  17.     Heat the rest of the oil, add a spoon of mustard seeds and hing.
  18.     Pour it over the vakkaya mixture.
  19.     Cover and leave it for a few hours.
  20.     As the pieces are slightly cooked, the pickle can be eaten soon after it is made. 
  21.     Kind of instant pickle!


Monday, 22 June 2020

Dhokla with atukulu and vegetables (Dhokla with poha)

Dhokla is a vegetarian dish from Gujarat and neighboring states. It is mainly made with fermented batter made by mixing rice flour and besan (chickpea) flour. Dhokla is a popular breakfast dish or eaten as a snack item.

No vegetables are added to original dhokla. But, this version of dhokla, I have used poha (flat rice) as the main ingredient. Some besan (chickpea flour) and oats are added for binding the mixture together. Any available vegetables, finely chopped can be added. For quick fermentation, curd and baking soda are added. A spoon of lemon juice gives the additional flavour and helps in loosening of the mixture.

As no prior preparation or fermentation is needed and it is steam cooked, with lots of vegetables. this dish is good and ideal for either breakfast or snack. As poha, oats and besan are not heavy to digest and many vegetables are added it is a one pot whole some meal!

Poha dhokla can be served with green mint chutney and tomata ketchup. As I do not keep any ketchup at home. I made some tomato beetroot chutney to go with dhokla.

Idli making pot details are given in the blog post idli


Ingredients:


  • 1 and 1/2 cups poha (medium thick)
  • 1/4 cup besan
  • 1/4 cup oats
  • 1/2 cup curd
  • 3 tablespoon onion chopped
  • 3 tablespoon capsicum chopped
  • 2 tablespoon carrots chopped
  • 2 tablespoon red capsicum chopped
  • 3 to 4 tablespoon methi leaves (fenugreek leaves) chopped
  • 3 tablespoon grated paneer
  • 2 teaspoon cilantro chopped
  • 1 or 2 green chiles chopped (according to taste)
  • 4 tablespoon oil
  • 1 teaspoon mustard seeds
  • 1 teaspoon white til (sesame seeds)
  • Few curry leaves
  • 2 green chiles
  • 2 teaspoon lemon juice 


Spice powders:


  • 1 teaspoon eating soda (soda bicarb)
  • 1/2 teaspoon turmeric powder
  • 1/2 teaspoon chile powder
  • 1 teaspoon garam masala
  • 1/2 teaspoon chat masala
  • 1 teaspoon chile flakes
  • A pinch of hing
  • Salt to taste


Directions:


  1. Roast oats in a thick pan for a minute or two.
  2. Add besan to the same pan and remove from heat.
  3. Wash poha in water, strain it and set aside after adding 2 or 4 spoons af water.
  4. Fine chop all the vegetables and set aside.
  5. You may add any available vegetable like green peas, shredded cabbage etc.
  6. Grind oats and besan coarsely.
  7. Take poha in a bowl.
  8. Add oats mixture.
  9. Add curd.
  10. Add powder masalas.
  11. Add salt.
  12. Mix together using a fork.
  13. Add all the vegetables one after the other.
  14. Add green chiles and cilantro. 
  15. Using your hand, mix the whole mixture thoroughly.
  16. Add 2 spoons of oil.
  17. Mix well. 
  18. If necessary, add a spoon or two of water.
  19. Make sure the mixture is not too wet.
  20. Add lemon juice.
  21. Mash well with your hand.
  22. Consistency should be less watery than onion pakodas mixture.
  23. Heat one or two cups of water in a idli making pot.
  24. Grease a cake pan or any cooker inset pan.
  25. Spread the poha mixture evenly in the pan.
  26. Place the pan on a stand in the idli pot.
  27. Cover the pot and let it cook, like when you make idli or dhokla.
  28. It is not necessary to put the pressure knob.
  29. After 10 minutes, remove the lid and check with a tooth pick, whether the material is cooked.
  30. If, the material is sticking to the tooth pick, cover and cook for a few more minutes.
  31. Once the mixture is cooked, remove from heat, remove the cover.
  32. Let the cake cool completely.
  33. If it is not at room temperature, it will break, when you try to reverse it onto a pan.
  34. Heat oil in a pan, add mustard seeds, til seeds, hing and red chile.
  35. Add green chile and curry leaves.
  36. Taking care not to break, place the cake on to the hot oil in the pan.
  37. Let it cook for a minute or two.
  38. Using a wide spatula, carefully reverse the cake.
  39. Let it cook for a minute and remove from heat.
  40. Now Dhokla with poha and vegetables is ready to serve.
  41. Dhokla can be served along with tomato ketchup and mint chutney.


Saturday, 20 June 2020

Sambar along with fresh sambar masala

Sambar is one of the most popular traditional Indian dishes. Sambar's origins may be traced to Tamil nadu. But now, sambar is more or less universally accepted as a protein packed and nutrient dish.

Sambar is lentil-based vegetable stew cooked with dal and tamarind broth.

Sambar is eaten along with rice for lunch or dinner. It is served along with idli or dosa as a side dish for breakfast.

Usually one or more of these vegetables are added to sambar. The vegetables are okra (bhindi), moringa, carrot, radish, pumpkin, potato, tomato, whole or halves shallots or onions.

Sambar powder, which is a powdered mixture of roasted dals, coriander seeds etc. Sambar powder is commercially available in stores and also in the Indian stores in USA. Sometimes shop bought powder is spicy. For people who do not want spicy powder, I have given a recipe for fresh ground masala.

Every household has their own recipe for making sambar. This is possibly my version of sambar.


Ingredients:


  • 1/2 cup toor dal
  • 1/2 cup masoor dal
  • 1/2 cup diced sorakaya (lauki/bottle gourd)
  • 1/2 cup sliced onions
  • 1/2 cup sliced tomatoes
  • 4 or 5 pieces of drumsticks( saijan or moringa pieces)
  • Any vegetables of your choice can be added.

  • 1/2  teaspoon turmeric powder
  • Pinch of hing
  • 2 teaspoons sambar powder
  • 2 to 3 teaspoons tamarind paste
  • 2 teaspoons grated coconut (fresh or dehydrated) 
  • A few curry leaves
  • A few leaves of cilantro.
  • Salt to taste.

Directions:

  1. Wash and cut all the vegetables.
  2. Wash and cook dal with enough water in a pressure cooker.
  3. Set aside the cooked dal. 
  4. Cook the vegetables in a thick bottomed vessel or a pressure cooker.
  5. When vegetables are cooked and not mushy, add cooked dal.
  6. Add a pinch of hing.
  7. Add tamarind paste, turmeric powder, sambar powder and grated coconut.
  8. Let the mixture cook for 5 to 20 minutes.
  9. Add salt and mix well.
  10. Add curry leaves.
  11. Transfer to a serving dish.
  12. Garnish with cilantro.

Fresh Sambar masala recipe

Ingredients:


  • 2 teaspoons coriander seeds
  • Red chile (optional)
  • 1 teaspoon chana dal
  • 1 teaspoon urad dal
  • A few grains methi seeds
  • 1/2 teaspoon black pepper
  • 1 table spoon grated coconut 

Directions:

  1. Roast all the ingredients except coconut, without oil.
  2. Add grated coconut.
  3. Remove from heat.
  4. When cool, grind together after adding some water.
  5. Grind till the paste is smooth.
  6. Add the paste to the sambar mixture and let cook.


Wednesday, 17 June 2020

Pesarattu (moong dal dosa)

Pesarattu or moong dal dosa is a very popular and common breakfast dish in Andhra Pradesh.  Moong dal chilla made in north Indian cuisine is very close to pesarattu.
Attu in Telugu means dosa. Moong beans are called "pesalu". Hence the name pesarattu. Pesarattu is served along with allam (ginger) chutney or coconut chutney.
Pesarattu can be made using whole moong beans, split moong dal with skin or yellow moong dal. green split moong dal or whole moong is preferred. But, in this recipe, I have used moong dal without skin (yellow) as it was in the house.
All the three varieties make nice dosas.
In some recipes, a few spoons of rice are added to the dal while soaking. But, I prefer not to use any rice in my recipe.
It is served in combination with upma and is essentially from Andhra cuisine. In many eateries, combination of upma and pesarattu is called MLA pesarattu!!
It is a healthy and nutritious dosa variety. It is vegan and gluten free also.


  Moong beans, split moong dal with skin and the same without skin (yellow):                                     


Soaked drained dal:


Dal ground with red chili and jeera added:


For garnish:


Spread on the pan and garnish added:


Flipped to cook on the second side:


Ingredients:

  •      2 cups of moong dal, green whole or split with skin or yellow (green preferred)
  •      salt to taste
  •      3 or 4 red chilis
  •      jeera seeds
  •      oil for frying
For garnishing:
  •      3 tsp. finely chopped onin
  •      1 tsp. finely chopped ginger
  •      1 tsp. finely chopped green chili
  •      2 tbsp. soaked yellow moong dal
  •      2 tsp. grated carrot
Directions:
  1.      Soak dal for at least 4 to 5 hours. (if using whole moong beans, soak longer).
  2.      Grind along with red chilis.
  3.      No fermentation is needed for pesarattu.
  4.      Add salt and jeera seeds. .
  5.      Heat a non-stick skillet on medium heat.
  6.      Test by sprinkling a few drops of water on it. If the water sizzles away, the skillet is hot enough for pesarattu making.
  7.      Pour a big spoon of batter in the center and spread it round and round, starting from the center, spiral outward until evenly spread, to make a 6 to 8 inch disc. 
  8.      After spreading on pan, add garnishing.
  9.      Add a spoon of oil around the edge.
  10.      Try to lift from an edge and see if it leaves the pan without sticking to it. It has to get a golden brown color.
  11.      Flip and continue to cook.
  12.      When both sides are cooked, serve hot.

Wednesday, 10 June 2020

Pudina pacchadi (Green mint sweet and sour chutney)


Pudina or mint is an aromatic perennial herb. A lot of varieties of mints are grown in many countries. The most common and popular mints for commercial cultivation are peppermint and spearmint. Mint leaves, without a qualifier like 'peppermint' or 'apple mint' generally refers to spearmint leaves. 

Spearmint, also known as garden mint, common mint is a spiecies of mint native to Europe and most  Asian countries. Many species of mint are grown in many parts of the world, including South Africa, North America and South America.

Pudina or spearmint has been used traditionally as medicine for minor ailments such as fevers and digestive disorders.

Spearmint has many health benefits and helps as an anti-tumor, anti-oxidant and anti-microbial agent.

Spearmint oil is used as insecticide and pesticide.

Pudina or spearmint is used to make chutneys or dips etc. Also, in Indian cuisine it is used as a flavoring agent for pulaos and biryanis. Beverages like spearmint tea, mojito and mint julep are very popular all over the world.

While selecting the leaves, make sure that the leaves are tender and not too fibrous. Leaves from some species of mint are not tender. If the leaves are not soft and tender, texture of the chutney will not be good. 


Ingredients:

  • 2 cups cleaned pudina leaves (Fresh mint leaves)
  • 2 teaspoons oil
  • 2 teaspoons tamarind paste
  • 3 tablespoons jaggery
  • 2 or 3 red or green chiles
  • 1/2 teaspoon turmeric powder
  • 1 teaspoon methi mustard powder
  • Salt to taste


Directions:

  1. Wash mint and remove any stems etc.
  2. Dry on a clean towel so that the leaves are not wet.
  3. Heat oil in a thick pan.
  4. Add mint leaves and stir well.
  5. Sauté for 3 to 4 minutes.
  6. When the leaves loose most of the moisture, add all the other ingredients.
  7. Mix well.
  8. Remove from heat, let cool.
  9. Transfer to a processor and grind.
  10. Add a few spoons of water, if needed.
  11. Transfer to a jar.
  12. Chutney can stay for about a week or 10 days, if kept in a refrigerator.
Note:  

Make sure the leaves are young and tender. When the leaves and stems are not tender, there is a lot of fiber which spoils the consistency of the chutney. Also, some of the varieties of mint have different flavors. 


Tuesday, 26 May 2020

Dal powder for Idli etc.


Here is a simple recipe which is a very handy non spicy side dish for idli, dosa etc.

There has been a repeated request from some of the young readers for this recipe.
Powders sometimes known as "gun powder" are available in market.  They happen to be very spicy and people who are not used to spicy food or children cannot enjoy.

Main ingredients in this recipe are chana and urad dals coriander seeds. Red chiles are optional.

If you do not want to roast and powder chiles, you may just add some chile powder to the dal and coriander mixture. If roasting red chiles, it is advisable to add a few drops of oil to the pan, to avoid strong fumes. If not using red chiles, you need not add any oil.

Powder, if kept dry, can be saved for nearly one year. The powder can be used for stuffing baigan (eggplant), kundru (ivy gourd/tindora) etc. It can be used as a taste maker in any vegetable pan fries  like potato etc.


Ingredients:


  •      1 cup chana dal
  •      1 cup urad dal
  •      1 and 1/2 cup dhania (coriander seeds)
  •      1 cup or more peanuts
  •      A few red chiles or chile flakes (according to your choice)
  •      1/2 teaspoon oil
  •      Salt to taste


Directions:


  1.      Heat oil in a thick pan.
  2.      Add red chiles and roast for 2 or 3 minutes.
  3.      Transfer the chiles to a plate.
  4.      Heat the same pan and roast chana dal without adding any more oil.
  5.      Keep stirring till the dal changes colour and gives out a nice aroma.
  6.      Transfer to the same plate.
  7.      Similarly dry roast urad dal and dhania seeds separately and transfer to the plate.
  8.      Roast peanuts and let them cool.
  9.      Peel and add to the mixture.
  10.      When the mixture is at room temperature, grind in a blender or in a mill.
  11.      The powder need not be too fine.
  12.      Add salt and mix thoroughly.
  13.      Transfer to an airtight jar.
  14.      Can be kept for nearly an year, if handled safely.